Run Period End checks
Updated Feb 29th, 2024
Who is this guide for?
Accounts Users and Accounts Supervisors
When you are ready to run your period end and would like to check the figures, use this guide to assist you in running the relevant reports.
Trial Balance (TB) report
- To run this report; select Reports, Financial Management, Trial Balance. Tick the Show this Period option so that you can see the total movement on the accounts for the current period, Click Run
- Ensure that the totals on the final page of the report agree – This Period Dr and This Period CR should agree. Year To Date Dr and Year To Date Cr should agree
Office Bank balances
Ensure that each of the Office banks have been reconciled and that the Cash Book figures agree to the Trial Balance Year To Date (YTD) figures
- Select Banks & Journals, select the relevant Office bank, ensure that Branch All and Department All are selected, click on Refresh
- The Cash Book Balance should agree with the YTD figure shown on the Trial Balance
- The Bank Balance should agree with the closing balance at month end on your Bank Statement
- Check for any unusual un-presented items by running the Bank Reconciliation report by clicking on the Print option, then click on Run. The Report Viewer window opens with the Bank Summary report, to get to the list of un-presented items click on the button in the top left-hand corner marked with >>
- Repeat this for each of your Office Banks
Fees Receivable
Ensure that the Fees figure on the TB agrees with the total on the Fees Journal
- Select Banks & Journals, select the Fees Jnl, ensure that Branch All and Department All are selected, click on Refresh
- The Account Balance should agree with the YTD Fees Journal figure on the Trial Balance report
VAT Creditor
Ensure that the VAT figure on the TB agrees with the balance on the VAT Journal
- Select Banks & Journals, select the VAT Jnl, ensure that Branch All and Department All are selected, click on Refresh
- The Account Balance should agree with the YTD VAT Journal figure on the Trial Balance report
Petty Cash balance
Ensure that the Petty Cash figure on the TB agrees with the balance on the Petty Cash Journal
- Select Banks & Journals, select Petty Cash, ensure that Branch All and Department All are selected, click on Refresh
- The Account Balance should agree with the YTD Petty Cash/Cash in Hand figure on the Trial Balance report
- Ensure that this figure also agrees with the Float in your Petty Cash tin
Write Offs
Ensure that the Write Off figure on the TB agrees with the balance on the Write Off Jnl
- Select Banks & Journals, select the Woff Jnl, ensure that Branch All and Department All are selected, click on Refresh
Purchase Ledger Creditor
Ensure that the Trade Creditors figure on the TB agrees with the balance on the Day Book and the Purchase Ledger Balances report
- Select Banks & Journals, select the Day Book, ensure that Branch All and Department All are selected, click on Refresh
- The Account Balance should agree with the Trade Creditor YTD figure on the Trial Balance report
- Select Reports, Other Financial, Purchase Ledger Balances, click on Run, go to the last page of the report and ensure that the report total agrees with the Trial Balance Trade Creditor figure
Debtors
Ensure that the Debtors figure on the TB agrees with the figures on the Ledger Balance report
- Select Reports, Client Financial and Ledger Balance
- Ensure that the filter for Exclude Future Postings is set to Yes (this will ensure that the report does not pick up any postings in the next financial period) and click Run
- Add the total of the Office column to the Disbursements total and this should equal the Trial Balance Debtors figure. If you use the Counsel Fees posting type you will also need to add the CFees Debtor figure from the Trial Balance to the Trial Balance Debtors figure
Aged Debtors Report and Batch Aged Debtor Letters
Print off an Aged Debtor report and run any aged debtor letters if required. Ensure that the Balance agrees with the Ledger Balance Office column total.
- Select Reports > Client Financial > Aged Debtors.
- Add filtering if required and change Ordering and Grouping if desired, then click Run.
- If Aged Debtors letters are to be produced, Select Reports > Client Financial > Aged Debtors > Run Batch Aged Debtor Letters (the document templates should be set up within the Supervisor area prior to doing this)
- Select the relevant letter, 0-30 days, 31-60 days etc., and enter a minimum debt amount if required, then click Run.
- Repeat for all periods of letter to 91+ days.
Client Bank
Ensure that the Client Banks have been reconciled and the Cash Book figure agrees with the Ledger Balance report
- Select Banks & Journals, select the Client Bank, ensure that Branch All and Department All are selected, click on Refresh
- The Bank Balance figure should agree with the closing balance at month end on your Bank Statement
- Select Reports, Client Financial and Ledger Balance, ensure that the filter for Exclude Future Postings is set to Yes, set the filter for Summary Only to Yes and click on Run. The total of the Client column on this report should agree with the Cash Book figure in Banks & Journals
- Repeat this check on each Client bank
Client Balances
Check for overdrawn Client and Deposit balances
- Select Reports, Client Financial and Ledger Balance
- Ensure that the filter for Exclude Future Postings is set to Yes
- Tick the filter for Balance Filtering, against Client Balances enter 0.00 and set the Qualifier to <, against Deposit Balances enter 0.00 and set the Qualifier to <
- Ensure that the option Or is selected (not And)
- Run the report, if any matters are listed they have overdrawn balances and need to be investigated
Credit Office and Disbursement Balances
Check if there are any matters with credit balances on Office or Disbursements
- Select Reports, Client Financial and Ledger Balance
- Ensure that the filter for Exclude Future Postings is set to Yes
- Tick the filter for Balance Filtering, against Office Balances enter 0.00 and set the Qualifier to <, against Disbursement Balances enter 0.00 and set the Qualifier to <
- Ensure that the option Or is selected (not And)
- Run the report, if any matters are listed they have credit balances and need to be investigated
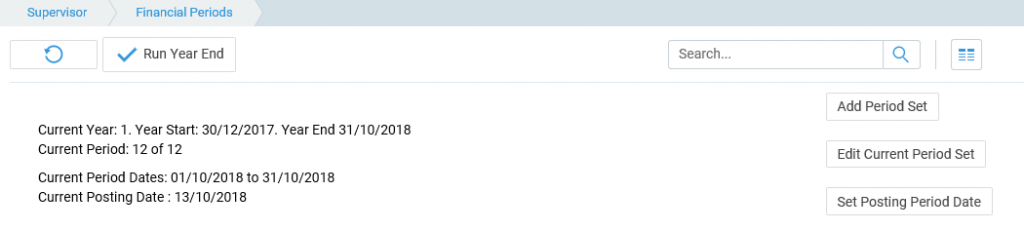
Close Period
To close a period, navigate to the ‘Supervisor’ area of Osprey and select ‘Financial Periods’. Now click on the ‘Run Period End’ option at the top of the page.
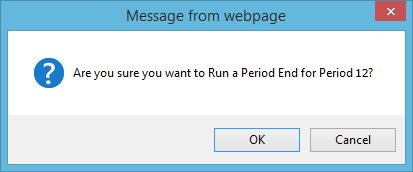
A message appears asking for confirmation that you want to run Period End appears, click on OK to close the period.
The Period End reports can then be accessed by clicking on the ‘Run Report’ icon column or from Reports > Financial Management > Period End